Abstract Factory Design Pattern

Type: Creational Design Pattern

Definition: Creates an instance of several families of classes. Helps to control objects creation.

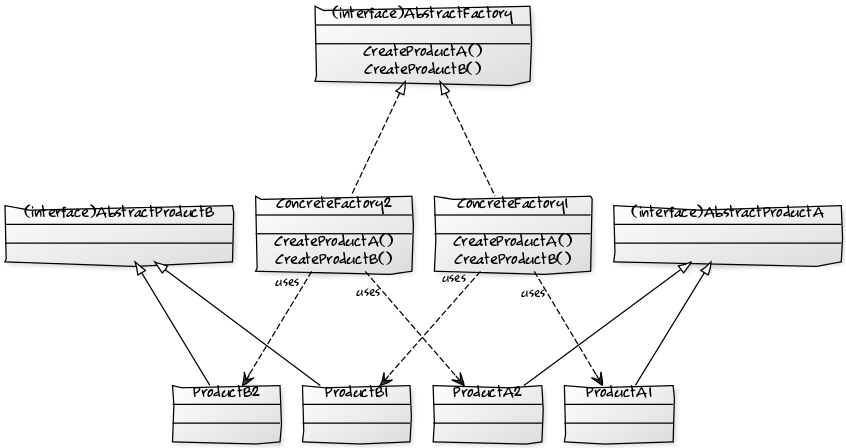
UML Classical Diagram:

Example UML Diagram

To be more specific we will create factory that produces sweets. Here the UML example for the code that will be shown in the next steps.
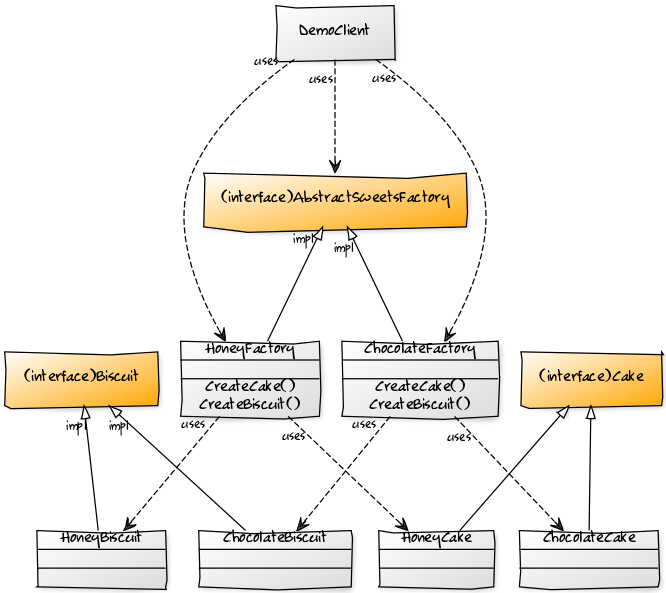
  • impl = implements

The Code

1. Create Abstract Products
First of all let’s develop type of sweets that we will be delivering later from factories to our client (that will happen in the ClientDemo class with the main() method). We can create and deliver cakes and bisuits.
 
interface Cake {
    String getCream();

    String getDough();
}
 
public interface Biscuit {
}
1. Create Concrete Products
Cakes and bisuits could be different types according to people preferences. We will prepare chocolate and honey cakes.
 
public class ChocolateCake implements Cake {

    @Override
    public String getDough() {
        return "chocolate dough";
    }

    @Override
    public String getCream() {
        return "chocolate cream";
    }

    @Override
    public String toString() {
        return "Enjoy Chocolate Cake made of Dough= " + this.getDough() + ", Cream=" + this.getCream();
    }
}
 
public class HoneyCake implements Cake {

    @Override
    public String getDough() {
        return "honey dough";
    }

    @Override
    public String getCream() {
        return "honey cream";
    }

    @Override
    public String toString() {
        return "Enjoy Honey Cake made of Dough= " + this.getDough() + ", Cream=" + this.getCream();
    }
}
And we will prepare chocolate and honey biscuits.
 
public class ChocolateBiscuit implements Biscuit {

    @Override
    public String toString() {
        return "Enjoy your Chocolate Biscuits!";
    }
}
 
public class HoneyBiscuit implements Biscuit {
    @Override
    public String toString() {
        return "Enjoy your Honey Biscuits!";
    }
}
3. Create Abstract Factory
This is an example of an AbstractFactory which is represented as an interface to create different types of abstract Products (Cake and Bisuit in our case)
 
public interface AbstractSweetsFactory {
    Cake getCake();

    Biscuit getBiscuit();
}
}
4. Create Concrete Factories
Next step is to create Concrete Factories that implement the AbstractFactory interface. Concrete Factories should return conrete types of Products. As concrete products we have:
  • honey cakes (HoneyCake),
  • chocolate cakes (ChocolateCake),
  • honey bisuits (HoneyBiscuit),
  • and chocolate bisuits (Chocolate Bisuit).
So, we can create one factory that will deliver products made of honey and another factory that will create products with chocolate. (HoneyFactory and ChocolateFactory)
 
public class HoneyFactory implements AbstractSweetsFactory {
    @Override
    public Cake getCake() {
        return new HoneyCake();
    }

    @Override
    public Biscuit getBiscuit() {
        return new HoneyBiscuit();
    }
}
}
 
public class ChocolateFactory implements AbstractSweetsFactory {
    @Override
    public Cake getCake() {
        return new ChocolateCake();
    }

    @Override
    public Biscuit getBiscuit() {
        return new ChocolateBiscuit();
    }
}

DemoClient Result

 
public class DemoClient {
    public static void main(String[] args) {
        System.out.println("Let's get a honey cake and biscuits");
        AbstractSweetsFactory honeyCakeFactory = new HoneyFactory();
        System.out.println(honeyCakeFactory.getCake());
        System.out.println(honeyCakeFactory.getBiscuit());

        System.out.println("\nLet's get a napoleon cake and biscuits");
        AbstractSweetsFactory napoleonCakeFactory = new NapoleonFactory();
        System.out.println(napoleonCakeFactory.getCake());
        System.out.println(napoleonCakeFactory.getBiscuit());
    }
}
Output:
 
Let's get a honey cake and biscuits
Enjoy Honey Cake made of Dough= honey dough, Cream=honey cream
Enjoy your Honey Biscuits!

Let's get a napoleon cake and biscuits
Enjoy Napoleon Cake made of Dough= classical dough, Cream=butter cream
Enjoy your Napoleon Biscuits!

Advantages

  1. Details of set of objects implementetion are splitted from their usage by the Client.
  2. Client will not create objects by him/herself but AbstractFactory will. That can simplify the code from the objects creation as the Client is isolated from concrete objects creation.
  3. Concrete Factories make sure that the products which are used together whithin a concrete factory are the right ones. The client doesn’t know about the implementation and product families.

Disadvantages

    If the logic for some of the factories needs to be changed then an interface will have to be updated. When an interface has been changed then every particular Factory has to be modified as well. Until everything is needed is modified the Client is broken.

Practical Usage

  1. Providing data access to different data sources: PostresSQL Database, Oracle Database, etc. Different classes for getting access will be created. All of them will inherit from a base class that defines the common methods for loading, updating, removing, saving. When a client needs access to some database he/she will call AbstractFactory that knows which kind of data source it will load. Client doesn’t know the detail of actual loading.
     BaseAccess access = new PostreSQLAcess();
     access.load();
     
     BaseAccess access = new OracleSQLAcess();
     access.load(); 
  2. Abstract Factories are great for supporting multiple platforms while keeping your code-base unified.
  3. Good for creating different types of documents(letter, resume, feedback) in different formats (classical, stylized).

Interesting about the pattern

  1. AbstractFactory is an alternative to Facade. It is used to hide platform-specific classes.
  2. AbstractFactory are often implemented with FactoryMethods but it can be also implemented with Prototype design pattern.

Used resources:

Diagram creation: https://yuml.me/diagram/scruffy/class/draw

Examples from StackOverflow: https://stackoverflow.com/questions/2280170/why-do-we-need-abstract-factory-design-pattern

Continue Reading

How To Create a GitHub Repository

Introduction

Recently there emerged a necessity to use Git on a regular basis. First of all we migrated to Git at job. Second I had a git training. And third reason is that sometimes I do programming exercises and I have never uploaded them anywhere so I would like to straight things out.

I have already installed Git and have a registration on GitHub. In this article I would like to show how I first started to work with Git and which problems I came up against.

Git is a control system to manage computer file versions. Mostly it is used in the area of software development for tracking changes in a source code. It also helps to organize work on the code among multiple developers. It is important to mention that Git is a command-line tool.

GitHub is a web-service of projects hosting using Git version control. Developers can store and share their projects there. It is a kind of social network site for developers.

The most interesting thing to me for the beginning is how to create a GitHub repository.

Configure identity on server

First step is to configure my identity for a commit to GitHub repository. Open git bash and type:

$ git config --global user.name "GitHub user name"
$ git config --global user.email "GitHub user email"

First variant how to create a GitHub Repository

Create a new repository on GitHub

Copy the link of a new created project on GitHub

https://github.com/materiaBio/HelloWorld.git is the copied link from the GitHub.

Clone a GitHub repository

Using git bash I need to clone GitHub repository to a directory of my git projects for futher implementation work. For me it is a "D://projects/git".  From the folder run:

$ git clone https://github.com/materiaBio/HelloWorld.git

Now I have cloned a GitHub repository on my local computer in the folder "D://projects/git/HelloWorld"

Git status of the project

$ git status

This command control the status of my developed project which I will periodically commit to GitHub repository. It is seen from the comment that I have nothing to commit.

Create your project in a new cloned GitHub repository

Then I created an idea project in folder "D://projects/git/HelloWorld".
With git status I can see the status of files of my project.

Untracked files means that Git finds files which I haven`t commited yet. It means that these files are absent in previous snapshot. I haven`t done any snapshot yet (commit command) and it logically means that all my files are in the untracked status.

Add the files to index

$ git add

Git will not start including my files in my commit snapshots until I tell it to do so. Before I commit changes to local repository they need to be added to the place called the gitindex. It is a cache where a developer place files for further commit to git repository.

Now files are in staged status that is why index is also known as “staging area”.

Commit to a local repository

Now files are added to index and can be commited to a local repository.

Here I faced two challenges:

1. I want to ignore several files with “.idea” extension. To do this I added a pattern “**/.idea/” to the git exclude file “D:\projects\git\HelloWorld\.git\info\exclude” to exclude “.idea” folder. Don`t forget that “.git” is often invisible folder but it is there in the root of the working project.

2. LF” will be replaced with “CRLF”. It is a “line ending” problem. I don`t share my projects with other developers that is why I can ignore this problem for now.

  • LF (line feed) mostly used in Unix-like systems
  • CR (carriage return) Macintosh
  • CRLF (line feed + carriage return) Windows
Commit  and push the changes

Now I`m ready to commit the project to a local repository and then push the changes to the remote GitHub repository.

$ git commit -m “comment to commit”
$ git push

Let’s have a look at GitHub

Yippeeeeeee, it is there!


Second variant how to create a GitHub Repository

Let`s assume that I have already implemented somewhat project code and I want to add it to the GitHub.

First of all I created a repository on GitHub called “SecondProject” and then I needed to upload my existing local project with the same name “SecondProject” to the remote GitHub repository.

Initialize the project

Using Git Bash I run the command from my project directory ("D:\projects\git\SecondProject") :

$ git init

This command creates an empty Git repository or reinitialize an existing one.

Add all files from project to index

The next two commands were explained in the previous part “First variant how to create a GitHub Repository”.

$ git add .
$ git commit -m ‘comment’

Remote address

Add the remote address for a created project with:

$ git remote add origin "GitHub repository link"

The above command creates a new remote repository called origin which is located at https://github.com/materiaBio/SecondProject.git(was copied from GitHub repository). Now I can execute “push” command to origin instead of using the whole URL.

origin is a default name of how Git calls the server from where I can clone the GitHub project

Upload files to the GitHub

Now I can try to upload the files to GitHub with:

$ git push origin master

After this command is executed it is possible to push the commited files from the local branch called master to the remote repository called origin.

Rejected “push” and “pull”

It is seen from the above image that the “push” command was rejected. After reading the comment I decided to execute the “pull” command.

But it failed again with comment: “fatal: refusing to merge unrelated histories”.

Unrelated histories

This error occurred because the commit history of my local project (its files were commited) does not match with the remote commit history. Local and remote projects are disparate what means they “know nothing about each other” and their commit histories are different.

I allowed unrelated histories with the command:

$ git pull origin master --allow-unrelated-histories

By executing this command the remote history first followed by the commit were merged to a local commit history.

Push files to the GitHub

Now I can try to upload the files to GitHub once again with:

$ git push origin master

Yes, it is succesfully pushed to the GitHub repository. Now I can push all changes in SecondProject code to the GitHub whenever I need that.

Continue Reading